I picked up a kids chainsaw at a thrift store awhile back. It had a missing bar that had been clearly broken off. The electronics and lights still worked, so my son still played with it. I had envisioned replacing the bar with a 3d printed one should the opportunity arise. Now is that time. I don’t have any 3d modeling experience save a couple of tries at Blender over the years and some basic Google Sketch-up projects. Therefore I decided to use my ChatGPT subscription to farm out some of the work. Through a prompt question I learned ChatGPT can indeed create a .stl file. I started with scaled pictures using my Kaiser RS1 copy stand.

With the copy stand, I can mount my phone camera as perpendicular as possible, utilizing scaled and calibrated heights and grids for the photos to be as perfect as possible. This allows for faithful reproductions of measurements later.
The idea in my mind was to provide ChatGPT with an image of the Husqvarna chainsaw and have it copy, extrapolate the missing bar geometry, and scale to the Bosch saw.


After the series of photos with dimensions, reliefs, protrusions, and screw holes mapped and measured, I uploaded them into ChatGPT. I asked for it to generate the plastic toy part by taking the chainsaw bar and chain from the orange chainsaw and adapting it to the blue-green saw. The first /stl iteration left much to be desired. There was no detail, the print was flat and the chain teeth looked like lugs. I asked AI to generate a few more versions, asking each time for more detail, but kept getting basic renderings.


I asked AI to create a line drawing adding greiblies and detail like a real chainsaw along with a logo in order to check AI’s work. It came up with this beautiful mockup.

I set out to have it use the line drawing as a basis to create a new .stl file. After about 6 minutes it came up with this:

Definitely not what I had in mind. I asked it why it had done such a poor job and it gave me some AI malarkey as well as potential fixes for its failures. I asked it to put those fixes into effect, which after 12 minutes led to this:

A much more detailed render, but still missing many features of the line drawing. Again I asked AI why it had only reproduced the line drawing in 2 dimensions, and predictably it apologized, said it had not in fact reproduced the line drawing faithfully, and suggested fixes. I again said to put the fixes into effect and reproduce the line drawing as an .stl file in all dimensions. This yielded this:

This version was much closer to the line drawing and after about an 45 minutes of prompting AI I figured this was close enough for a kids toy. There were some minor issues I wanted cleared up: The mounting screw holes were incorrectly placed, I asked that they be removed. I decided to make a template and use the drill press to make my own holes. Next the front chain guard was silly, so I asked it be removed. Finally I wanted two bar bolts on either side of the Bosch logo for realism. This is what it came up with.


I again asked that the .stl be recreated, but with raised pretend bolts on either side of the logo:

Almost there. The creation of the decorative bolts seemed to have introduced an artifact obscuring the Bosch logo, so back to the promps for resolution.

Now we’re talking!
I had asked ChatGPT to create optimum print settings in a previous iteration. They are as follows:
PRUSASLICER BASE PROFILE
- Printer: Original Prusa CORE One+ / 0.4 mm nozzle
- Print profile: 0.15 mm QUALITY
- Filament profile starting point: Generic PLA, then use the temperatures below
QUALITY / STRENGTH
- Layer height: 0.15 mm
- First layer: 0.20 mm
- Perimeters: 4
- Top solid layers: 6
- Bottom solid layers: 6
- Infill: 20% gyroid
- Extrusion width: Auto (or 0.45 mm external / 0.45 mm perimeter)
- Seam: Rear or Aligned; place seam toward the straight housing edge
- Elephant-foot compensation: 0.20 mm
- Detect thin walls: On
- Arachne perimeter generator: On
JESSIE PLA STARTING TEMPERATURES
- Nozzle first layer: 215 C
- Nozzle other layers: 210 C
- Bed first layer: 60 C
- Bed other layers: 55 C
- Fan: 100% from layer 3; bridges 100%
- If Jessie PLA’s spool label specifies a different range, use the label range.
SPEED / COOLING
- Use the Prusa 0.15 mm QUALITY speed values.
- First layer: 20 mm/s
- External perimeter cap: 45 mm/s
- Small perimeter cap: 25 mm/s
- Bridge speed: 25 mm/s
- Slow down if layer time is below 8 seconds.
ADHESION / SUPPORT
- Supports: Off (the pockets open to the build plate and top countersinks self-support)
- Brim: 5 mm, 0.10 mm separation gap
- Clean the satin/textured plate with 90%+ IPA. For maximum dimensional accuracy,
use a smooth PEI sheet in good condition.
I was about ready to print when I noticed the teeth on the bar nose were cut off when I slightly scaled the print. On to version 10 I guess.

Fixed:

I had ChatGPT give me some rapid prototype settings to use:
Quick prototype profile
| Setting | Value |
|---|---|
| Layer height | 0.28 mm |
| First layer | 0.25 mm |
| Perimeters | 2 |
| Top solid layers | 3 |
| Bottom solid layers | 3 |
| Infill | 8–10% |
| Infill pattern | Lightning or gyroid |
| Supports | Off |
| Brim | 3 mm |
| Seam position | Rear or aligned |
| Perimeter generator | Arachne |
| Detect thin walls | On |
Moderate speed limits
These are fast without pushing the printer near its limits:
| Feature | Speed |
|---|---|
| First layer | 20 mm/s |
| External perimeters | 45 mm/s |
| Internal perimeters | 75 mm/s |
| Small perimeters | 30 mm/s |
| Infill | 100 mm/s |
| Solid infill | 70 mm/s |
| Top solid infill | 45 mm/s |
| Bridges | 25 mm/s |
| Travel | Leave at the standard CORE One profile value |
I put in the suggested rapid prototype settings into the slicer and generated the code, however the difference in time between a “full” print and the prototype settings was only 30ish minutes. Coupled with my lack of understanding of the settings I changed and their substantial difference from stock settings made me weary. I opted to run the print with the stock settings.
Just as I was about to get the print going, I decided to have ChatGPT generate a .jpg so I could print a 1:1 version from my printer and see if it even fit the toy. Why waste filament and time? I’m glad I had this thought. I will have to keep it in mind for later prototypes.


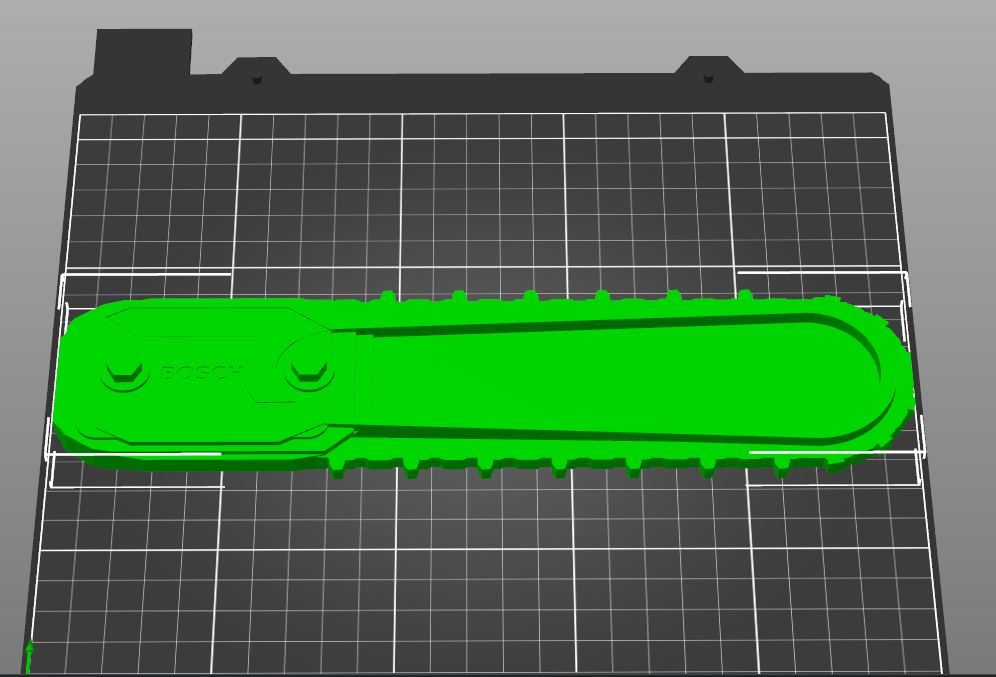
This is the layout with the mockup. I could make some minor changes to make it more realistic, but with this being my first foray into 3d printing and design I feel like I am towing the line of diminishing returns on my time. The main issue I see is with the sizing of the print lining up with the original toy’s mounting holes. To get around this I will carefully drill new mounting holes. I may tap them as well if I cannot find a fastener I like to hold the print to the body.
Off to print now. I am going to try a 30% infill as opposed to the 15% stock setting. My big concern again is the ability to put fasteners through the print into the body, and 15% infill might not leave me with little material to hold. Changing to 30% only adds 15 minutes to the print time.


The finished print turned out much better than I had expected. The supports were quite difficult to remove. After about ten minutes of pulling and prying I was able to get them all off.

I was able to drill new holes in the saw body and get it mounted up. I am glad I increased the print infill. I made the holes with a drill press which eliminated any drill bit wander and allowed more torque and drill speed control. I used bits that had a countersink head on them to allow for a recess in the print. I did not blow through the top layer into the infill. Next time I will research adding more top layers. This was a suggestion I just learned about after watching some YouTube videos on prop making. I didn’t do much to finish the piece and after a little sanding this saw is ready for some work.
Leave a Reply